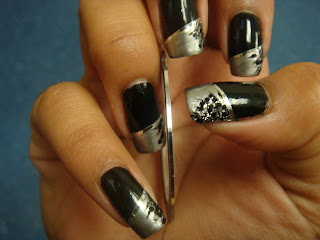
I really wanted to get this post up earlier in the day, but then I received a call from my aunt telling me that my dad was doing worse today. He has been in the hospital since last Sunday and seemed to be doing a lot better, until today when we found out he was in pain because of a bacteria in his blood. So, I was really not feeling inspired to write anything and just kept staring at my laptop and pictures of my nails. Anyways, I decided to take a trip to my "polish room" (it's really just a walk in closet) and I now feel in a better mood after spending some time surrounded by my lovelies.
I actually did this manicure in the waiting room at the hospital where my dad is in. The only reason why I did that was because he's in the chemotherapy ward and most people who go to that floor are outpatient, so the waiting room is empty 95% of the time. Otherwise, I would not have even thought of doing my nails at a hospital. The inspiration for this manicure was actually our truck. Lol, yes, our truck. It's black and full of chrome stuff on it, and I love the way it looks in the sun, so I decided to do something to that effect on my nails.
These are the products I used: Orly Liquid Vinyl, M.A.C. $$$$$ Yes, silver striping tape and black hexagonal glitter.
I started off with two coats of Orly Liquid Vinyl. I love black so much that I almost left it as is!
I then took M.A.C. $$$$$ Yes and created a diagonal french manicure. It took two coats to get it opaque. This is the first time I use this polish and I don't think I will ever wear by itself, since it left too many brush strokes. However, I liked how the brushed strokes showed on this particular manicure because to me it resembles brushed silver.
After that I took L.A. Colors Art Deco nail art polish in black and just created some swervy lines from the lower left corner going upwards. I would reccommend making the lines longer than what I did to make them more visible after the next two steps.
I then took L.A. Colors Art Deco nail art polish in silver and kind of went over and in between the black lines. This is why I should have made the black lines longer.
This step is optional, but I decided it need a little more dimension to the design so I added black hexagonal glitter in random places.
The last step was to cut pieces of the striping tape and place them where the black and silver polish meet to create a crisp line. I used the striping tape because it resembles the chrome I was going for and I really like the contrast of the striping tape next to the satin finish of M.A.C.'s $$$$$ Yes.
Since, I was at the hospital I didn't have any clear polish to finish off the look so this last picture has no clear coat. To make the striping tape last longer a good top coat like Seche Vite is necessary or else the edges will begin to lift up. Overall, I was happy with the way it turned out an I think this would be a great manicure for a wedding or a prom since my husband said it looked to fancy for a regular day at work lol. Although, I pay no attention to him and wear what I want when I want, even if it's too "fancy". So, that's it for today's post. Enjoy!


No comments:
Post a Comment
Please, feel free to leave a comment with your thoughts. I would love to hear your opinions. Good OR bad!