Showing posts with label neon. Show all posts

Wednesday, August 3, 2011

Neon Skittles Mani with Lynnderella Connect the Dots

 Connect the Dots is a really versatile glitter that will go well with any shade of polish, which is why I had originally planned to do several mani's with different colors. However, when I brought out the colors I was planning to use, it occurred to me that it would be a lot more fun if I did a Skittles mani. I have never done one and wasn't sure what colors to start with, so I went with five polishes from Color Club's Poptastic Collection. I used Wham Pow! for the pinky, Pucci-Licious for the ring finger, Twiggie for the middle finger, Warhol for my index and Chelsea Girl for my thumb topped with one coat of Connect the Dots.


 Indirect sun picture.

Shade picture.

Sun picture. 

Semi shade picture. 


 I think Connect the Dots was a great glitter to tie the look together, without covering up the base colors. I won't talk much about this polish, since I have previously blogged about it here, but oh man is this literally the greatest glitter ever made. I am really excited that Lynnderella has decided to restock this one along with The Glittering Crowd and Snow Angel, because I just might have to pick up a few more bottles of this incredible glitter.  This is her website http://lynnderella-lynnderella.blogspot.com/, she will update it as soon as she is ready to start taking orders. I would start practicing on your clicking skills now, if you are at all interested in her creations, since these polishes are sure to sell out FAST!

Saturday, July 9, 2011

Glitter Envy with Starry Temptress Top Coat

  This is the second polish I try from Color Club's Starry Temptress Collection and I have to say this one was a fail. The polish was super thick, yet it left bald spots so I had to use three coats. I couldn't get them to be thin coats and it looks like the polish is just caked on! I liked the color and I want to try it again, but first I need to buy some thinner. I can't believe I haven't bought some yet. I really need it for my Seche Vite top coat. I have six bottles that are halfway full, but they became gloopy. Instead of buying thinner, I have just been buying new bottles.

 I don't like the look of the polish on it's own, since the glitter doesn't shine, it's just there. In my opinion, if I'm going to go through the trouble of removal, it better freaking sparkle! So, I added a coat of Starry Temptress top coat. I like it much better with the top coat. It's not overly sparkly, but it has a nice effect.


I know most people find the Color Club polishes online, so you may not have the Starry Temptress top coat if you didn't buy the set. I was in Family Dollar yesterday and I found this, Sassy Sparkle by L.A. Colors from their Craze line and it's really similar to Starry Temptress. The glitter is a bit bigger on Sassy Sparkle, but it's a good option if you don't have Starry Temptress.

See. Almost identical.


AND here is Dexter!! He wouldn't stay still long enough to let me get a good pic, but he's still uber cute!

Wednesday, June 22, 2011

Nina Ulta Pro Blu Blaze

 Since trying out Color Club's Otherwordly, I have been on the hunt for that exact same color, but without the glitter. I have bought a few polishes that I thought might be it. This is one of them. In the bottle it's a bright blue neon, but sadly it doesn't stay like that once dry. 

Here is a sun picture. I used two coats but there was a tiny bit of visible nail line, so I would reccommend three coats to ensure it's opaque. As you can see, the color in real life comes really close to the bottle color when it's in the sun.

This picture was taken in the shadows cast by my carport. It actually looks a bit brighter here.

Here is what it looks  like in real life with no sun.

Another picture of this lacquer's true color. There's part of my kids chalk drawings in the background, they were drawing robots.
 Although this is not the color that I was expecting to get, I have to say I was in love with this color while wearing it. I literally could not stop staring at it. I even used this color for my toes, and it looked so gorgeous! There was actually one time when I thought no one was around, in the breakroom at my workplace, so I just stopped to stare at my toes. I have no idea how long I was staring, but when I looked up there was a man looking at me like I was the craziest person in the world. I just laughed and proceeded to walk hurriedly away into the safety of my cubicle. That's it for today. I hope you enjoyed!

Tuesday, June 14, 2011

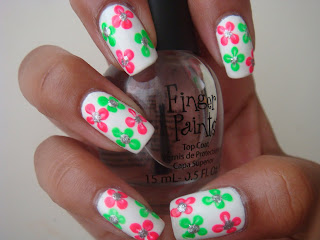
Tuesday's Nail Art: Neon Flowers

   I was watching Food Network Challenge on Sunday and the cakes were supposed to be about the 80's time era. Pretty much everyone was using neon colors, since those were popular back in those days and it just made me crave neon on my nails. I have never worn neon colors on their own because I think they're really loud but lately I've been on a neon buying frenzy. I suppose I owe that to all those girls out there strutting around with their neon colors. I love they way they look on other people, but I still haven't tried the solid neon look on my nails. ( I hope my husband doesn't end up reading this, or else he'll be even more upset about my nail polish buying if he finds out I'm buying colors that I don't necessarily wear!)   

   I'm still not ready to do the solid neon but I did come up with this idea to incorporate neon without being too loud. These are the products I used: M.A.C. Vestral White, Orly Va Va Voom, Sinful Colors Irish Green, Sally Hansen Celeb City and Finger Paints Top Coat.


   I started off with M.A.C Vestral White. I have been searching for a good white color and I still haven't been able to find one. This actually took 4 thin layers to prevent the streaking from showing up. I don't like to apply so many layers but it does end up looking really nice if you just work with it. 


   I am going to be doing 4 flowers on each nail, two pink ones and two green ones. I alternated the position of the flowers to make them seem random. To make the flowers you just need to place four dots as if dotting the corners of an imaginary square. I did two fingers at a time because the "lines" on the flowers are formed better if the polish is a bit tacky. Once it's a little tacky, I used a dotting tool to make the "lines". I started from the middle of each dot and dragged the polish towards the center. This will give the flower a more realistic look.


   Here I did the same with Sinful Colors Irish Green.

   After all your flowers are done, using the same dotting tool, I placde silver dots using Celeb City in the middle of the flowers. I chose silver rather than yellow because I wanted to give the design a more blingy look.


   It's not visible in the pictures but once you add the top coat. OMG. It just makes the whole design that much better. The top coat fills in all the "lines" that were created and makes it look really flawless.


   Here is a sun picture. Even though the design is flowers, I feel that it has that summery look because of the neon colors. Hope you enjoyed!